How to Self-Host Google Fonts on Every Major Platform

If your site uses the standard Google Fonts embed, every new visitor's browser has to connect to two Google domains before it can draw your text in the right typeface. Self-hosting Google Fonts removes both of those connections, and the font files arrive over the connection your page is already using.
My team and I have tested this extensively over years of speed optimization work at SpeedVitals, and self-hosting consistently makes a good difference. The tricky part is that the steps look completely different on WordPress, Shopify, Webflow, Next.js, or a Jekyll site.
In this article, I'll show you how to self-host Google Fonts on 20 platforms, how to prepare the files so they stay small, and how to confirm that no request to Google is left behind.
Use your platform's native font tool where one exists: the WordPress Font Library, next/font, @nuxt/fonts, or Astro's Fonts API. On Shopify, Webflow, Squarespace, Wix, and HubSpot, upload the font files as a custom font instead of picking from the built-in Google Fonts list. Everywhere else, put WOFF2 files in your theme or static folder and declare them with @font-face. Then confirm in DevTools that nothing loads from fonts.googleapis.com or fonts.gstatic.com.
The first half of this guide covers the workflow that applies everywhere. The second half goes platform by platform, so you can jump straight to yours from the table in Which Method Fits Your Platform.
What Self-Hosting Google Fonts Means
Self-hosting Google Fonts means your visitors' browsers get the font files from your own origin or CDN, and never from Google's servers. For that to happen, both of these domains have to disappear from your pages:
fonts.googleapis.com, which serves the CSS containing the@font-facerules;fonts.gstatic.com, which serves the actual font files.
A lot of "self-hosted" setups only get halfway there. A site isn't really self-hosting if it copies Google's CSS into its own stylesheet but leaves the src URLs pointing at fonts.gstatic.com. The same goes for a plugin that rewrites the stylesheet while the theme still prints a preconnect or @import for Google.
On managed platforms such as Shopify, Webflow, Squarespace, Wix, and HubSpot, an uploaded font is served from the platform's CDN rather than a server you control. For this article, that still counts as self-hosting in the practical sense, because the visitor's browser never contacts Google for the font.
Why Self-Host Google Fonts
Fewer Connections before Your Text Renders
With the standard embed, the browser first connects to fonts.googleapis.com and downloads a stylesheet, and only then discovers the font URLs inside it. After that, it connects to fonts.gstatic.com and downloads the files. Each new origin needs its own DNS lookup, TCP connection, and TLS handshake before a single byte of font data arrives.
Here's a quick illustration of both request chains:
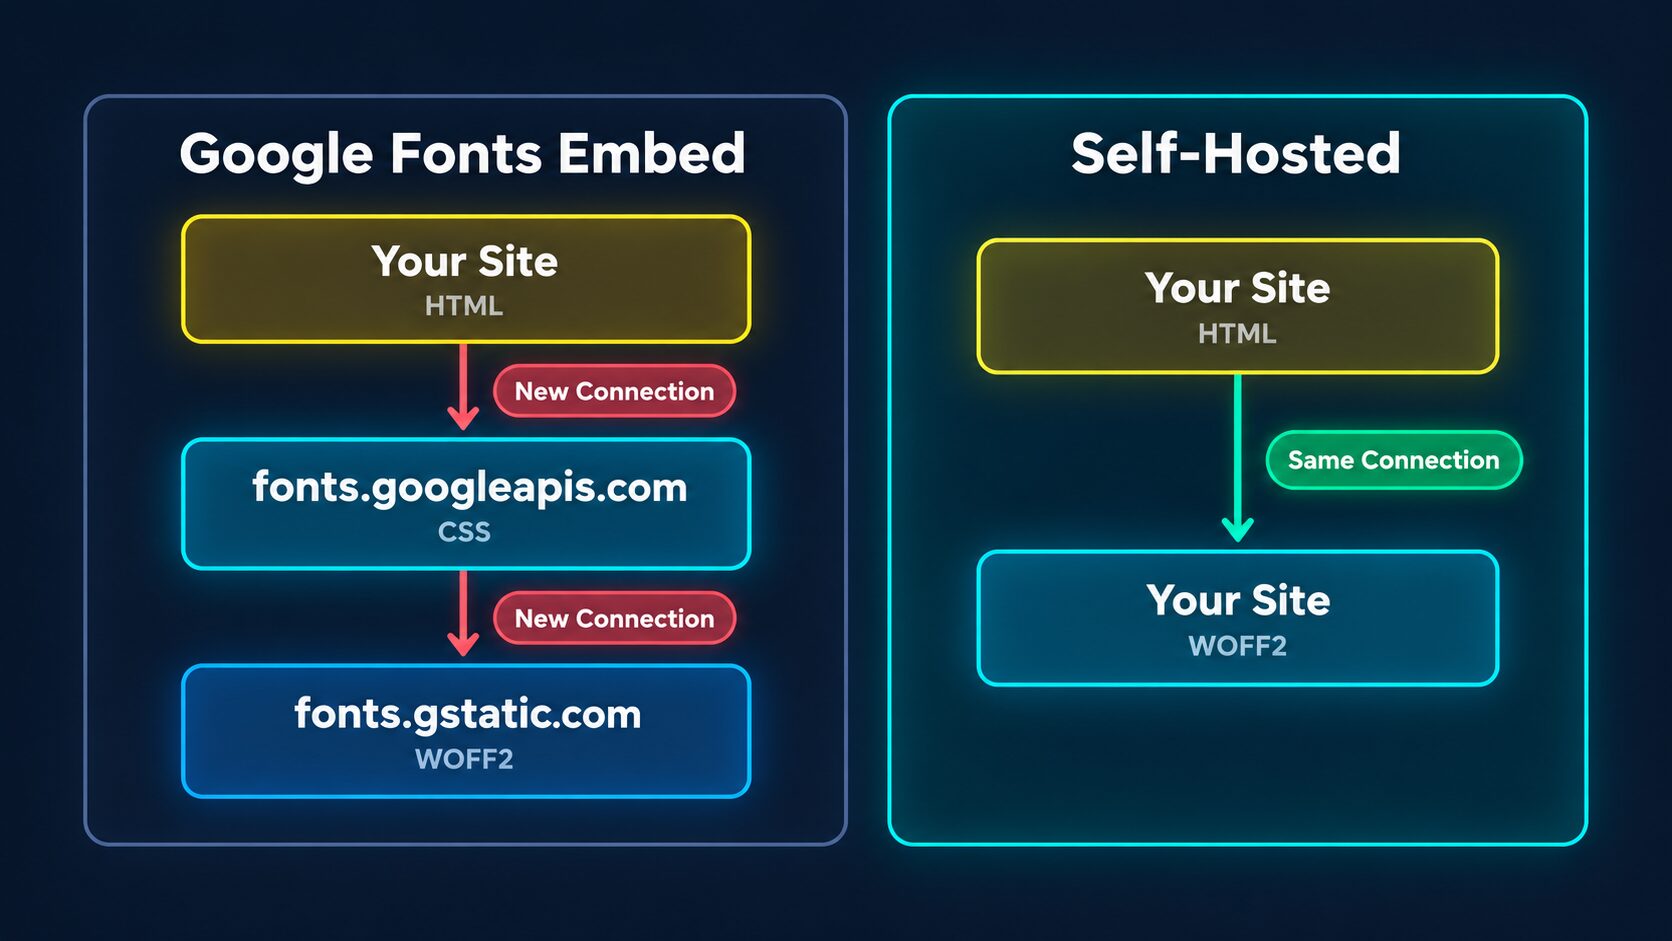
Notice that the self-hosted chain doesn't open any new connection. The font request reuses the connection that delivered your HTML and CSS, so there's no extra DNS, TCP, or TLS work sitting in front of your text.
The old argument for Google's CDN was that visitors already had popular fonts cached from other websites. That stopped being true when browsers began partitioning their HTTP cache by site, so a font cached on another website isn't reused on yours. I've covered this in my list of web performance mistakes.
Even Google's own web.dev course on web fonts says that in most cases, self-hosting web fonts is faster than downloading them from a cross-origin.
We also measured it on our old WordPress blog in 2021. I self-hosted its Google Fonts with the OMGF plugin, which also let me stop loading the fonts we weren't using. Here's a table of the lab results from the SpeedVitals Web Vitals test before and after that one step:
| Metric (Lab Test, 2021) | Before | After Self-Hosting | Change |
|---|---|---|---|
| Largest Contentful Paint (LCP) | 1.8 s | 1.2 s | 33% lower |
| First Contentful Paint (FCP) | 1.7 s | 1.1 s | 35% lower |
| Speed Index | 2.1 s | 1.6 s | 24% lower |
That's roughly a third off both LCP and FCP, on a page that already scored 98% after caching and JavaScript delay. The full walkthrough is in my WordPress Web Vitals case study.
Privacy
Loading a font from Google means each visitor's browser connects to Google's servers, which exposes their IP address to a third party just to render your typography. Webflow's help center says this directly about its own Google Fonts integration: it sends visitors' IP addresses to Google and may not be GDPR compliant.
Self-hosting removes that particular request, and many site owners do it to simplify their privacy compliance.
It doesn't make a whole site GDPR compliant on its own, though. Compliance also depends on your analytics, cookies, embeds, consent setup, and contracts.
Control and Reliability
Once the files live with your site, you decide the exact font version, the weights and styles, the language subsets, the cache lifetime, the font-display behavior, and what gets preloaded. None of that is possible when Google generates the CSS for you.
Your typography also stops depending on Google's font domains being reachable. That matters for visitors behind corporate firewalls, privacy extensions, regional filtering, or aggressive content blockers.
Can You Legally Self-Host Google Fonts?
Yes. The fonts in the Google Fonts collection are released under open-source licenses that allow redistribution, and the official google/fonts repository says you can self-host them, subject to each license's terms.
Most families use the SIL Open Font License (OFL), while a few older ones use Apache 2.0 or the Ubuntu Font License. Keep the license file that comes with each family, and read it before you subset or modify a font that declares a Reserved Font Name. Fonts from random download sites don't automatically come with the same rights.
How to Prepare Google Fonts for Self-Hosting
These steps apply to every platform in this guide. Native tools such as next/font handle most of them automatically, but knowing them helps you check the result.
1) List the Fonts Your Pages Actually Use
Before downloading anything, record which families, weights, and styles your pages actually render, along with the scripts (languages) you need. Also note which font appears above the fold, and which ones only show up in a logo, an icon, or a rarely used component.
The most common mistake is self-hosting every variant of a family when the page renders only two or three. For example, a typical blog might need just this:
Inter: 400 normal, 600 normal, 700 normal (Latin only)
That's three files, compared with nine weights from 100 to 900, every italic, and every script if you grab the whole family.
2) Get the WOFF2 Files
There are four good places to get the files:
- Your platform's native tool, such as the WordPress Font Library,
next/font,@nuxt/fonts, Astro's Fonts API, or Shopify's font library. These avoid most path and configuration mistakes. - The google/fonts GitHub repository, which holds the official font binaries and license files.
- Fontsource, which packages Google Fonts as npm packages (
@fontsource/interfor static weights,@fontsource-variable/interfor the variable version). It's the easiest route for npm-based projects. - google-webfonts-helper, a third-party tool (not a Google product) that gives you WOFF2 files and matching CSS for the weights and subsets you pick. Shopify's documentation points to it as well.
Whichever source you use, serve WOFF2. The web.dev course recommends it because it compresses better than the older WOFF format. Don't upload the raw TTF files from the Google Fonts download ZIP just because that's what the ZIP contained.
WOFF2 files are already compressed internally with Brotli, so your server doesn't need to gzip or Brotli-compress them again.
3) Write the @font-face Rules
Each weight and style you self-host needs its own @font-face rule. Here's the structure for two static weights:
@font-face {
  font-family: "Inter";
  src: url("/fonts/inter-latin-400.woff2") format("woff2");
  font-style: normal;
  font-weight: 400;
  font-display: swap;
}

@font-face {
  font-family: "Inter";
  src: url("/fonts/inter-latin-700.woff2") format("woff2");
  font-style: normal;
  font-weight: 700;
  font-display: swap;
}

body {
  font-family: "Inter", system-ui, -apple-system, "Segoe UI", sans-serif;
}
A variable font covers a whole weight range with one file, so the font-weight descriptor takes a range:
@font-face {
  font-family: "Inter";
  src: url("/fonts/inter-latin-variable.woff2") format("woff2");
  font-style: normal;
  font-weight: 100 900;
  font-display: swap;
}
The declared font-weight and font-style must match the actual file. If you label a 700 file as 400, or skip the italic files while your content uses real italics, the browser synthesizes fake bold or slanted text instead.
A variable font isn't automatically smaller, either. If your design uses only 400 and 700, two subsetted static files can weigh less than one variable file, so compare the transferred bytes before you pick one. Variable fonts make the most sense when your design uses several weights.
For multilingual sites, Google's own CSS splits each family into subsets (Latin, Latin Extended, Cyrillic, and so on) using unicode-range. The browser downloads a subset only when the page contains characters from it. Fontsource's CSS keeps those splits, and google-webfonts-helper lets you pick only the subsets you need. Don't subset aggressively on sites with user-generated or multilingual content, though, because missing glyphs fall back to a different font mid-sentence.
4) Choose a font-display Value
font-display decides what visitors see while the font is still downloading. Here's how the common values behave, based on MDN's font-display reference:
| Value | What Happens | Best For |
|---|---|---|
swap | Fallback text shows almost immediately and swaps to the web font when it arrives | Brand typography that must always appear |
fallback | A very short invisible period, then a short window to swap before the fallback stays | Body text where a late swap would be distracting |
optional | The browser may keep the fallback for the whole page view if the font is late | Performance-first sites where the fallback is acceptable |
block | Text can stay invisible for a few seconds | Avoid it for normal text |
swap is a safe default for most sites. If your fallback looks close enough to the web font, optional avoids late swaps entirely.
5) Preload Only the Critical Font
Preloading tells the browser to fetch a font before it finds the @font-face rule in your CSS. Use it for the one font file (two at most) that renders above-the-fold text:
<link
  rel="preload"
  href="/fonts/inter-latin-400.woff2"
  as="font"
  type="font/woff2"
  crossorigin
>
Keep the crossorigin attribute even when the font is on your own domain. Browsers fetch fonts in CORS mode, so a preload without it doesn't match the real request, and the font downloads twice. Our Resource Hint Validator flags these double downloads and unused preloads.
However, don't preload every weight. Each preload competes for bandwidth with your LCP image, critical CSS, and scripts. If an image is your LCP element, it deserves that priority more than a heading font, and I've explained how to preload the LCP image correctly. On WordPress, you can also send the font hint as a 103 Early Hint while the server is still building the page.
6) Cache the Files for a Year
Font files rarely change, which makes them ideal candidates for long-lived caching. For versioned files, send this header:
Cache-Control: public, max-age=31536000, immutable
immutable is safe only when the filename changes along with the file, such as inter-latin-400.8f4c2a.woff2 from a build tool. If your filenames never change, add a version to the name (inter-latin-400-v2.woff2) whenever you update a font.
Serve the fonts through the same CDN as the rest of your static assets (our CDN benchmark compares providers if you're still choosing one). If the fonts come from a different hostname, that host has to send an Access-Control-Allow-Origin header, or the browser blocks the font.
Which Method Fits Your Platform
Every platform in this guide falls into one of four approaches, and I'd use them in this order of preference:
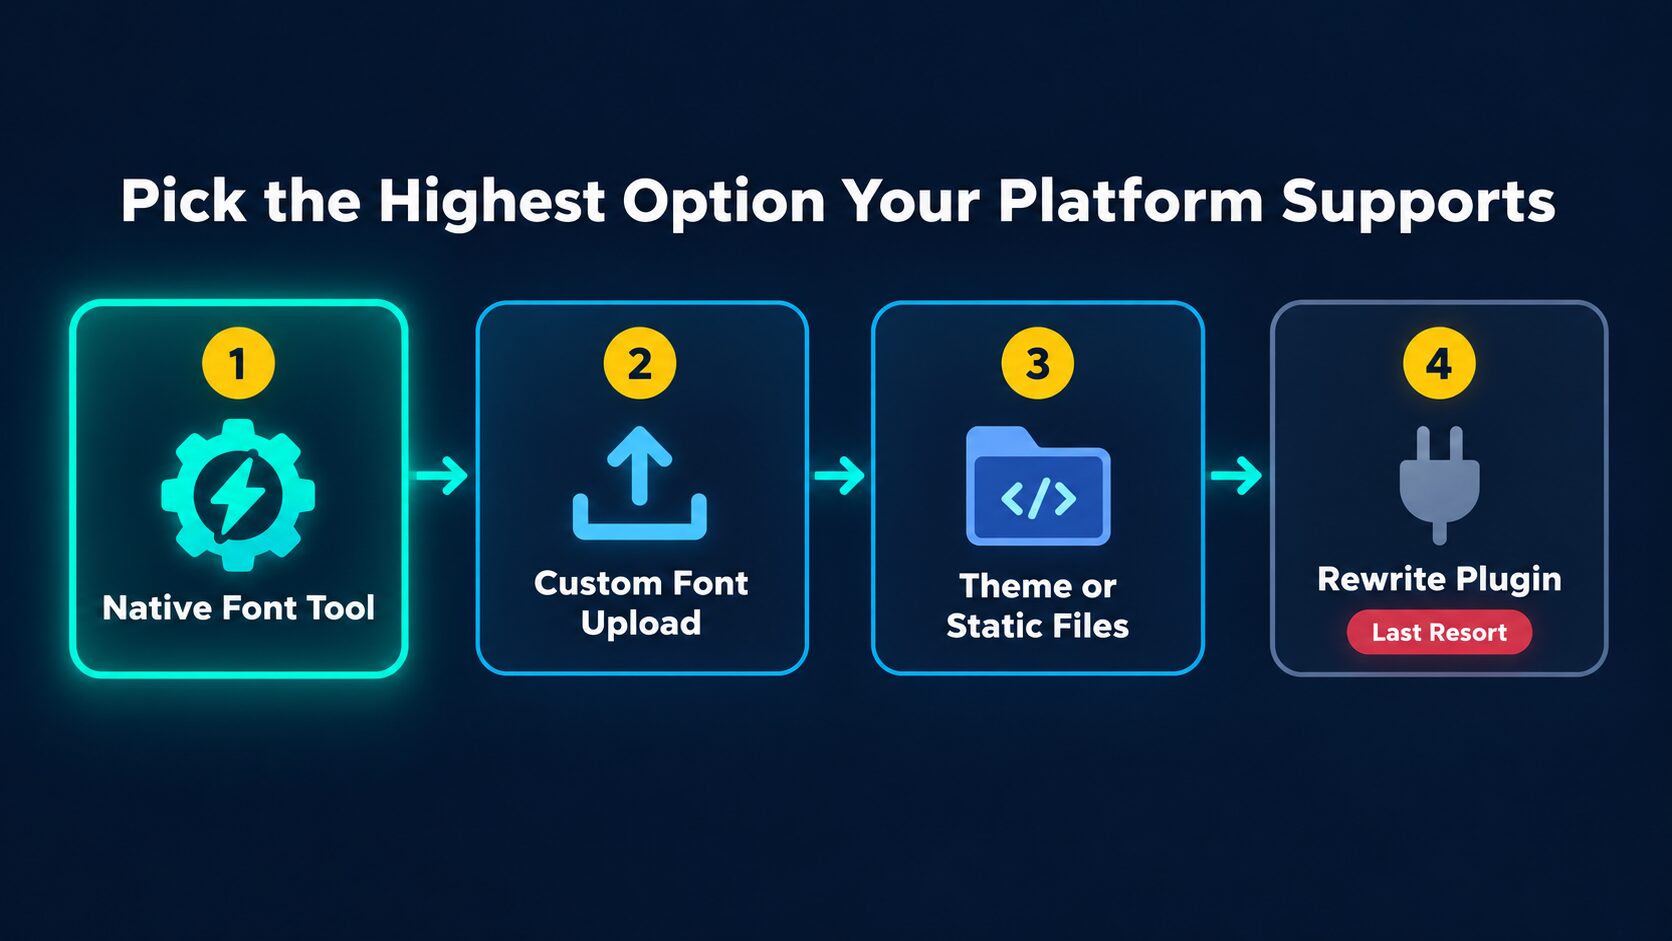
The higher the option, the less you maintain by hand. A native tool understands your platform's asset pipeline, while a custom-font upload hands delivery to the platform's CDN. A rewrite plugin sits at the bottom because it fixes Google Fonts after a theme or plugin has already added them.
Here's the best method for each platform:
| Platform | Best Method | Code Needed? |
|---|---|---|
| WordPress | Font Library, theme files, or OMGF for injected fonts | No to medium |
| WooCommerce | Same as WordPress | No to medium |
| Shopify | Theme assets or Files plus @font-face | Low |
| Adobe Commerce (Magento) | Theme web/fonts folder plus LESS | Medium |
| Drupal | Theme font files plus a CSS library | Medium |
| Joomla | Template media folder plus user.css | Medium |
| Ghost | Theme assets plus CSS | Medium |
| HubSpot CMS | Uploaded font files plus a stylesheet | Low |
| Webflow | Custom font upload | No |
| Squarespace | Custom font upload | No |
| Wix | Font upload | No |
| Next.js | next/font/google | Low |
| Nuxt | @nuxt/fonts | Low |
| Astro | Fonts API | Low |
| Gatsby | Fontsource or static/fonts | Low |
| SvelteKit | static/fonts or an imported asset | Low |
| React and Vue (Vite) | Imported font asset | Low |
| Eleventy | Passthrough copy plus @font-face | Low |
| Jekyll | assets/fonts plus @font-face | Low |
| Plain HTML and other Jamstack sites | /fonts folder plus @font-face | Low |
How to Self-Host Google Fonts in WordPress
WordPress gives you three routes, depending on how your theme and plugins load fonts.
Use the Font Library (No Code)
WordPress's built-in Font Library can install Google Fonts and host them on your own site. It arrived in WordPress 6.5 for block themes, and since WordPress 7.0 it's available under Appearance → Fonts for classic themes too:
- In the WordPress admin, go to Appearance → Fonts.
- Open the Install Fonts tab.
- Click Allow access to Google Fonts when WordPress asks for permission.
- Search for the family you need.
- Select only the weights and styles your design uses, and install them.
- Apply the family through your theme's typography settings.
- Clear your page cache and CDN cache.
The connection to Google happens only while you browse and install the font as an admin. WordPress then stores the files in wp-content/uploads/fonts, and visitors never contact Google for them.
Add Fonts through theme.json or Your Theme's CSS
If you keep your typography under version control in a custom block theme, keep the WOFF2 files in the theme (for example, assets/fonts/) and register them in theme.json:
{
  "version": 3,
  "settings": {
    "typography": {
      "fontFamilies": [
        {
          "fontFamily": "\"Inter\", sans-serif",
          "name": "Inter",
          "slug": "inter",
          "fontFace": [
            {
              "fontFamily": "Inter",
              "fontStyle": "normal",
              "fontWeight": "400",
              "src": ["file:./assets/fonts/inter-latin-400.woff2"]
            }
          ]
        }
      ]
    }
  }
}
WordPress generates the @font-face rules from this, as described in the theme.json typography docs. On a classic theme, put the same files in your child theme and add the @font-face rules to its stylesheet.
Use OMGF When Plugins Inject Google Fonts
Page builders such as Elementor and Divi, and plenty of plugins, inject their own Google Fonts requests. Hunting down every source by hand gets tedious, and that's where OMGF helps. It detects Google Fonts requests, downloads the files to your server, and rewrites the references to load them from your site.
OMGF is what I used on our old WordPress blog for the results above, and I'll recommend it for sites where the theme or builder is hard to modify. The free version covers standard Google Fonts stylesheet requests, while fonts pulled in through inline styles, @import, or the Web Font Loader need the Pro version's deeper detection.
Don't stack several font plugins, though. Some caching plugins, including FlyingPress, can also self-host Google Fonts (I compared those features in FlyingPress vs WP Rocket). Pick one tool for the job and turn off the font option in the others, or you'll end up with duplicate rewriting and preloads.
WooCommerce
WooCommerce doesn't need a separate method. Use whichever WordPress route fits your theme.
The catch is that WooCommerce extensions and page builders can enqueue different assets on different templates. After the change, check the shop, category, product, cart, checkout, and account pages separately.
How to Self-Host Google Fonts on Ecommerce Platforms
Shopify
If your font is available in Shopify's own font library, the easiest route is to pick it through your theme's typography settings (the font_picker setting). Shopify serves those fonts from its CDN, so no request goes to Google.
When the family isn't in Shopify's library, or you need a specific variable file or subset, upload your own files. Shopify's self-hosting documentation covers this workflow and recommends WOFF2 as the primary format:
- Add the WOFF2 files to your theme's
assetsfolder, through Shopify CLI or your theme's GitHub integration. - Create a snippet with the
@font-facerules, using theasset_urlfilter for each file. - Render the snippet inside the
<head>oflayout/theme.liquid, above{{ content_for_header }}. - Apply the family in your theme CSS.
- Remove the old Google Fonts
<link>or@import.
<style>
  @font-face {
    font-family: "Montserrat";
    src: url("{{ 'montserrat-latin-400.woff2' | asset_url }}") format("woff2");
    font-weight: 400;
    font-style: normal;
    font-display: swap;
  }
</style>
{% render 'self-hosted-fonts' %}
If you upload fonts through the Shopify admin instead, Shopify's theme fonts documentation recommends Content → Files rather than the theme code editor, because uploading some font types through the code editor can corrupt them. Reference those files with the file_url filter instead of asset_url.
For the rest of the storefront, my Shopify speed optimization guide covers apps, images, and scripts.
Adobe Commerce (Magento)
Adobe Commerce supports locally stored fonts in themes. Put the WOFF2 files in your theme's web/fonts folder:
app/design/frontend/<Vendor>/<theme>/web/fonts/
Then declare them in the theme's web/css/source/_typography.less file. Adobe's UI library includes a .lib-font-face mixin that generates the @font-face rule for you:
.lib-font-face(
    @family-name: 'Inter',
    @font-path: '@{baseDir}fonts/inter-latin-400',
    @font-weight: 400,
    @font-style: normal,
    @font-display: swap
);
Note that @font-path has no file extension, because the mixin adds it. Adobe's custom fonts guide also shows how to preload a font through a <font> node in the layout's head. The exact build and static-content deployment flow depends on your setup, so treat this as a theme-development task rather than an admin setting.
How to Self-Host Google Fonts on Other CMS Platforms
Drupal
The most predictable Drupal method is to keep the fonts inside your custom theme and load them through the theme's normal asset library:
themes/custom/mytheme/
  fonts/
    inter-latin-400.woff2
    inter-latin-700.woff2
  css/
    fonts.css
  mytheme.libraries.yml
  mytheme.info.yml
Write the @font-face rules in css/fonts.css with relative paths such as url("../fonts/inter-latin-400.woff2"). Then register the stylesheet as a library and attach it globally:
fonts:
  css:
    theme:
      css/fonts.css: {}
libraries:
  - mytheme/fonts
Drupal's asset library documentation also shows how to attach a library only to the pages or components that need it.
There's a contributed Google Webfonts Helper module that downloads the files and generates the library for you. However, its project page says it isn't covered by Drupal's security advisory policy, so I'd stick with the manual theme method on a long-lived production site.
Joomla
In Joomla, keep the font files in your template's media folder and put the @font-face rules in an update-safe file. For the default Cassiopeia template, Joomla's customization guide recommends a user.css file instead of editing core template files.
To create it, go to System → Site Templates → Cassiopeia Details and Files, select the css folder, and create a new file named user with the .css type. On Joomla 4.1 and later, it lives at media/templates/site/cassiopeia/css/user.css, so a fonts folder next to css keeps the relative paths simple:
@font-face {
  font-family: "Roboto";
  src: url("../fonts/roboto-latin-400.woff2") format("woff2");
  font-weight: 400;
  font-style: normal;
  font-display: swap;
}

body {
  font-family: "Roboto", Arial, sans-serif;
}
If you've customized more than user.css, use a child template, so a template update doesn't overwrite your changes.
After the change, search your template settings and extensions for fonts.googleapis.com, fonts.gstatic.com, and @import. A template option or a third-party extension can keep loading the remote copy even after the local one works.
Ghost
Ghost's built-in font picker isn't the same as self-hosting. When you pick a custom font in Ghost's design settings, the {{ghost_head}} helper loads it from Bunny Fonts, adding a preconnect and a stylesheet from fonts.bunny.net (see Ghost's custom settings docs). That avoids Google, but it's still an external font provider, not a font served from your own site.
For true self-hosting, add the fonts to your theme:
- Download your active theme from Ghost Admin.
- Put the WOFF2 files in the theme's
assets/fonts/folder. - Add the
@font-facerules to the theme CSS, with paths relative to the CSS file. - Rebuild the theme assets if your theme uses a CSS build step.
- Upload and activate the updated theme.
- Keep Ghost's font picker on the theme default, so it doesn't load a second copy from Bunny Fonts.
If you preload the main font in default.hbs, use Ghost's {{asset}} helper, which adds the correct path and cache-busting:
<link rel="preload" href="{{asset "fonts/inter-latin-400.woff2"}}" as="font" type="font/woff2" crossorigin>
Code Injection works for small CSS tweaks, but it isn't a clean way to package and version actual font files. Theme assets are the better home for them.
HubSpot CMS
HubSpot lets you upload custom font files and use them in themes. Its documentation lists TTF, OTF, and WOFF as the supported formats, so WOFF is the lightest option there. For a manual setup:
- Upload the font files under Content → Files (in HubSpot's navigation, click More first).
- Copy each file's URL.
- Open your stylesheet under Content → Design Manager.
- Add
@font-facerules that point to those URLs. - Apply the family and publish the changes.
HubSpot's documentation also notes that when developers use its font field in themes or custom modules, HubSpot can load those fonts from your content's domain instead of the third-party font service.
Keep in mind that this covers your website only. Email clients have very different web font support, so a self-hosted font won't reliably render in HubSpot marketing emails.
How to Self-Host Google Fonts on Site Builders
Webflow
Webflow's own help center recommends downloading Google Fonts and uploading them as custom fonts if you want to avoid sending visitors to Google:
- Download the font files, preferably WOFF2 (Webflow's limit is 4 MB per file).
- Open Site settings → Fonts.
- Scroll down to Custom fonts and upload each file you need.
- Check that each upload has the correct family, weight, and style.
- Use the uploaded family in the Designer.
- Remove the same family from the Google Fonts integration if it's there.
- Publish the site.
Webflow has one catch worth knowing. If your uploaded font has the same name as a family in its Google Fonts library, Webflow may keep loading the Google version. Its upload guide suggests a distinct name such as Montserrat-Local.
Squarespace
Squarespace has a native custom font uploader:
- Open Site Styles, then Fonts (on version 7.0 sites, it's Design → Site Styles).
- Choose a typography role: Headings, Paragraph, or Buttons.
- Open the font dropdown and click the upload icon.
- Upload your WOFF2 files and apply the font.
- Replace any Google font still assigned to another role.
Squarespace accepts OTF, TTF, WOFF, and WOFF2, so pick WOFF2. Variable font files with multiple weights work, but files that contain multiple styles (such as normal and italic in one file) aren't supported yet.
Wix
Wix supports font uploads in both the Wix Editor and the Studio Editor. In the Wix Editor:
- Select a text element and click Edit Text.
- Open the fonts dropdown and choose Upload Fonts.
- Upload your file. Wix accepts WOFF2, WOFF, TTF, and OTF, and recommends WOFF2 for performance.
- Apply the uploaded font from My Fonts.
Uploaded fonts aren't available on every Wix surface, since some app components have their own typography limits. Check those components after the switch.
How to Self-Host Google Fonts in JavaScript Frameworks
Next.js
Next.js has one of the best implementations, so you don't need to download anything by hand. According to the Next.js font docs, next/font/google downloads Google Fonts at build time and serves them with your other static assets, so the visitor's browser never sends a request to Google:
import { Inter } from 'next/font/google'

const inter = Inter({
  subsets: ['latin'],
  display: 'swap',
})

export default function RootLayout({ children }) {
  return (
    <html lang="en" className={inter.className}>
      <body>{children}</body>
    </html>
  )
}
swap is already the default display value, and Next.js preloads the font by default. Specify the subsets you need, because Next.js uses them to decide which files to preload (and warns you when they're missing). Prefer a variable font when it replaces several static files, and avoid loading many large families globally. If you use Tailwind or design tokens, pass a variable option (such as variable: '--font-inter') and reference the CSS variable instead.
For a font you've already downloaded, next/font/local keeps the same optimizations while the files stay in your codebase. Either way, delete any leftover Google Fonts <link> tags from your layout.
Nuxt
For Nuxt, the official @nuxt/fonts module does the same job. Install it with:
npx nuxt module add fonts
Once it's installed, a family you reference in CSS (font-family: 'Inter', sans-serif;) gets resolved automatically. In production, the module downloads the font files at build time, hashes them into your build assets, and serves them from your own origin with long-lived cache headers.
To make a family available globally, configure it explicitly:
export default defineNuxtConfig({
  modules: ['@nuxt/fonts'],
  fonts: {
    families: [
      { name: 'Inter', provider: 'google', global: true }
    ]
  }
})
Nuxt Fonts also generates adjusted fallback metrics, which helps with layout shift (more on that below).
Astro
Astro's Fonts API became stable in Astro 6, and it supports Google, Fontsource, Bunny, Adobe, and local files as providers. You configure the font in astro.config.mjs and add the <Font /> component to your page head:
import { defineConfig, fontProviders } from 'astro/config'

export default defineConfig({
  fonts: [
    {
      provider: fontProviders.google(),
      name: 'Inter',
      cssVariable: '--font-inter',
      weights: [400, 700],
      styles: ['normal'],
      subsets: ['latin'],
    },
  ],
})
---
import { Font } from 'astro:assets'
---
<head>
  <Font cssVariable="--font-inter" preload />
</head>
Astro downloads the font files and copies them to the _astro/fonts folder of your build, so they're served from your site with the same long-lived caching as your other static assets. Set weights and styles explicitly, so the build downloads only the variants your design uses. Use the preload prop only on the font that renders above-the-fold text. If you'd rather keep the WOFF2 files in the repository, use the local provider instead.
Gatsby
Gatsby's documentation covers two self-hosting approaches. The first is to put WOFF2 files in static/fonts/ and reference them with root-relative paths:
@font-face {
  font-family: "Inter";
  src: url("/fonts/inter-latin-variable.woff2") format("woff2");
  font-weight: 100 900;
  font-display: swap;
}
The second is Fontsource, which Gatsby's web font guide documents as a way to self-host Google Fonts:
npm install @fontsource/open-sans
import "@fontsource/open-sans/400.css"
import "@fontsource/open-sans/700.css"
Import only the weights your site uses. Fontsource works the same way in any other npm-based project, including the Vite and SvelteKit setups below.
SvelteKit
SvelteKit serves everything in the static folder as-is, so the simplest setup is:
static/fonts/inter-latin-400.woff2
static/fonts/inter-latin-700.woff2
Then reference them from your global CSS with url("/fonts/inter-latin-400.woff2"). SvelteKit runs on Vite, so you can also keep the fonts under src and reference them with relative paths. Vite then fingerprints the filenames, which makes the one-year immutable cache safe.
React and Vue with Vite
Vite-based React, Vue, Solid, Preact, and vanilla projects have both of those options too. I recommend the imported-asset route:
src/assets/fonts/inter-latin-400.woff2
src/styles/fonts.css
@font-face {
  font-family: "Inter";
  src: url("../assets/fonts/inter-latin-400.woff2") format("woff2");
  font-weight: 400;
  font-style: normal;
  font-display: swap;
}
Vite processes the relative URL and outputs the font with a hashed filename, according to its static asset docs. Files in public/fonts/ work too, but Vite copies them with unchanged filenames, so you'd need your own versioning before using immutable.
How to Self-Host Google Fonts on Static Sites
Eleventy
Eleventy's asset documentation explicitly covers web fonts. Keep the files in src/fonts/ and copy them to the output folder with a passthrough copy:
export default function (eleventyConfig) {
  eleventyConfig.addPassthroughCopy({ "src/fonts": "fonts" })
}
The object syntax maps src/fonts to /fonts/ in the build output, so url("/fonts/inter-latin-400.woff2") works in your CSS.
Jekyll
Jekyll copies any file without front matter into the generated site as a static file. A typical layout looks like this:
assets/
  fonts/
    inter-latin-400.woff2
  css/
    main.css
In main.css, use a relative path such as url("../fonts/inter-latin-400.woff2"). A relative path keeps working if your site lives under a baseurl, which is common for GitHub Pages project sites. Your host (GitHub Pages, Cloudflare Pages, Netlify, and so on) then serves the font like any other static file.
Plain HTML and Other Jamstack Sites
"Jamstack" describes an architecture rather than one framework, so the workflow from the preparation section applies as-is. Put the WOFF2 files in your source or static asset folder, make sure the build copies or bundles them into the output, write the @font-face rules, and remove the Google Fonts tags. A good final build output looks like this:
dist/
  index.html
  assets/
    site.css
    inter-latin-400.abc123.woff2
    inter-latin-700.def456.woff2
This is close to the ideal setup, because the fonts ship from the same CDN as the rest of the site, and hashed filenames make the one-year immutable cache safe.
Prevent Layout Shift When the Font Swaps
font-display: swap keeps your text visible, but the swap from the fallback to the web font can change word widths, line breaks, heading heights, and button sizes. That shows up as Cumulative Layout Shift (CLS).
Self-hosting doesn't fix this on its own. What fixes it is a fallback font whose geometry matches the web font, using the size-adjust, ascent-override, descent-override, and line-gap-override descriptors:
@font-face {
  font-family: "Inter Fallback";
  src: local("Arial");
  size-adjust: 107%; /* example: measure your own font pair */
  ascent-override: 90%;
  descent-override: 22%;
  line-gap-override: 0%;
}

body {
  font-family: "Inter", "Inter Fallback", sans-serif;
}
Next.js and Nuxt Fonts generate these fallback values automatically. Everywhere else, calculate them for your exact font pair instead of guessing, as I explained in how to reserve space for fonts and text. To confirm the fix, our CLS finder shows each shift frame by frame along with the element that moved.
How to Check That Google Fonts Are Gone
Don't assume the switch worked. Verify it in the browser:
- Load your page and open DevTools → Network.
- Hard refresh the page (Ctrl+Shift+R, or Cmd+Shift+R on a Mac).
- Filter by Font and check the domain of every font file.
- Clear the filter and search all requests for
googleapisandgstatic.
A fully self-hosted page shouldn't need either domain for typography. Also search the rendered HTML (View Source) for leftovers like these:
<link rel="preconnect" href="https://fonts.googleapis.com">
<link rel="preconnect" href="https://fonts.gstatic.com" crossorigin>
<link rel="stylesheet" href="https://fonts.googleapis.com/css2?family=Inter">
Remove any you find. An unused preconnect still opens a connection the page doesn't need.
For a quick check of server-rendered HTML from the command line:
curl -s https://example.com | grep -Ei 'fonts\.googleapis\.com|fonts\.gstatic\.com'
No output means the HTML is clean. This won't catch fonts injected later by JavaScript or an @import inside a stylesheet, so DevTools is still the final check.
You can also run the page through our website speed test and look at the waterfall, which lists every font request with its host. If you need to share the evidence with a developer, export a HAR file from the Network panel and open it in our HAR file analyzer, which groups requests by hostname and parses the file locally in your browser.
Common Self-Hosting Mistakes
Check for these mistakes after any migration:
- Downloading every weight. Shipping 100 to 900 plus italics when the page uses 400 and 700.
- Hosting TTF instead of WOFF2. The TTF works, but it's heavier than it needs to be.
- Loading both copies. The local font works, but a theme, builder, or plugin still loads Google's version. Search the rendered page, not just your theme files.
- Too many preloads. A preload is a priority instruction, so preloading five fonts pushes your LCP image back in the queue.
- Missing cache headers. A font downloaded again on every page view loses much of the benefit.
- Mismatched declarations. A 700 file declared as 400, or real italics with no italic file, makes the browser fake the style.
- CORS errors on a separate asset domain. Fonts need
Access-Control-Allow-Originwhen they come from another hostname. @importfor critical fonts. An@importdelays discovery compared with@font-facerules in your main CSS.- Trusting a builder's "Google Fonts" menu. Picking a font from a built-in Google Fonts list usually still loads it from Google.
Conclusion
Self-hosting takes both Google origins out of your critical path, and on our old WordPress blog, it cut LCP and FCP by about a third in our lab test.
Summing up, here's your best choice:
- On WordPress? → Use the Font Library, and add OMGF only if a theme or builder keeps injecting Google Fonts.
- On Shopify, Webflow, Squarespace, Wix, or HubSpot? → Upload the font files (WOFF2 wherever the platform accepts it) as a custom font instead of using the built-in Google Fonts list.
- On Next.js, Nuxt, or Astro? → Let
next/font,@nuxt/fonts, or the Fonts API handle it. - On anything else? → Put WOFF2 files in your theme or static folder, write the
@font-facerules, and cache them for a year.
And if a system font stack fits your brand, that's faster still, because there's nothing to download at all:
font-family: system-ui, -apple-system, BlinkMacSystemFont, "Segoe UI", sans-serif;
Whichever route you take, test the page before and after, and check the Network panel for any request to fonts.googleapis.com or fonts.gstatic.com that's still hanging around. And if fonts aren't your biggest bottleneck yet, my guide on what matters most in website performance optimization shows where they rank among the other fixes.